Purchase high quality, low ESR, motherboard grade, long life, high temperature rated capacitors for your iMac G5 motherboards and PSUs.

The first in a series of how to fix an iMac G5 PowerPC mother board (MOB).
This procedure is for repairing the iMac G5 MOB Logic Board and video problems. For Apple iMac G5 PSU, see how to fix an iMac G5 power supply.
Click here for Apple iSight G5 logic board model information.
The success rate for these do-it-yourself repairs are quite high, at greater than 95% when following the instructions. *** See note at the end of the article.
Hello to the French MacGeneration.
Bonjour à la France MacGeneration.
Translate this page using Google Translate Widget on the right.
Traduire cette page en utilisant Google Translate widget sur la droite.
I had to get the lead out when it comes to repairing the Apple iMac G5 PPC motherboard problems. Beware; please read these MOB iMac G5 repair instructions carefully before attempting this procedure for replacing of the capacitors on an iMac yourself. This Apple iMac G5 logic board repair is not as difficult as it sounds. If you wish to save a substantial amount of money on iMac repairs and mother board replacement, possibly have a buddy that can help, or even have some experience yourself with a few handy tools at your disposal, or have a local computer repair technician that might be willing to do the job, or willing to take on a challenge yourself and have a dead mac you wish to revive, then this is the best Apple iMac G5 repair procedure for you. Also, beware of the time commitment involved with this Apple computer repair. “Be prepared,” is the old Boy Scout motto, and that is no lie when it comes to tackling this Apple product repair yourself. iMac serial numbers are listed below to see if your Apple serial number was covered in the original problem.
Other Helpful Apple iMac G5 Information
Additionally you may also go to any Apple Retail Store with a Genus Bar, and have the Apple folks take a look inside the G5 and look at the caps on the iMac logic board for you. Find the nearest Apple Retail Store – Genius Bar in your area, and take your Mac and get in the queue, or better yet, make an appointment online for the Genius Bar. Apple provides technical support for Mac, iPod, Apple TV, and iPhones at the Genius Bar too.
›Apple iMac G5 Hard Drive Data Recovery for those that want to recover the information from their hard drives on a dead Mac.
Apple iMac G5 PowerPC Motherboard Repairs Picture Before
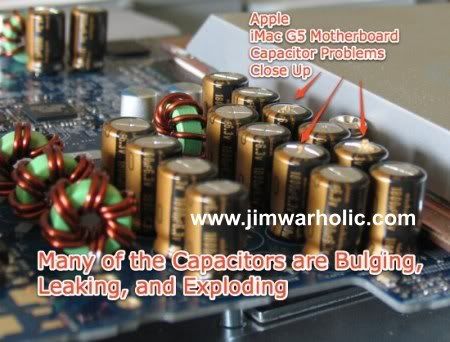
1st Generation Apple iMac With Bad Caps
This is a close up view of the Apple iMac G5 Motherboard (20 inch model) with the bulging, leaking, and exploding capacitors problem. Take a look at Fat Caps & Ripple Current for more info into engineering and design of electronics equipment. This is a first generation model pictured above. Go to the bottom for second generation iMac G5 comparison picture. This Apple G5 PPC motherboard is three years and two months old. The symptoms of the problem were: video shaking, video disappearing, video lockup, system lockup, intermittently could not power down, intermittently powering up problems, and strange program lockups. Here is a YouTube Video from someone else that shows a very similar Apple iMac G5 startup problem with the video display. Note the vertical lines in the video display.
After Apple iMac G5 Motherboard Repairs Picture

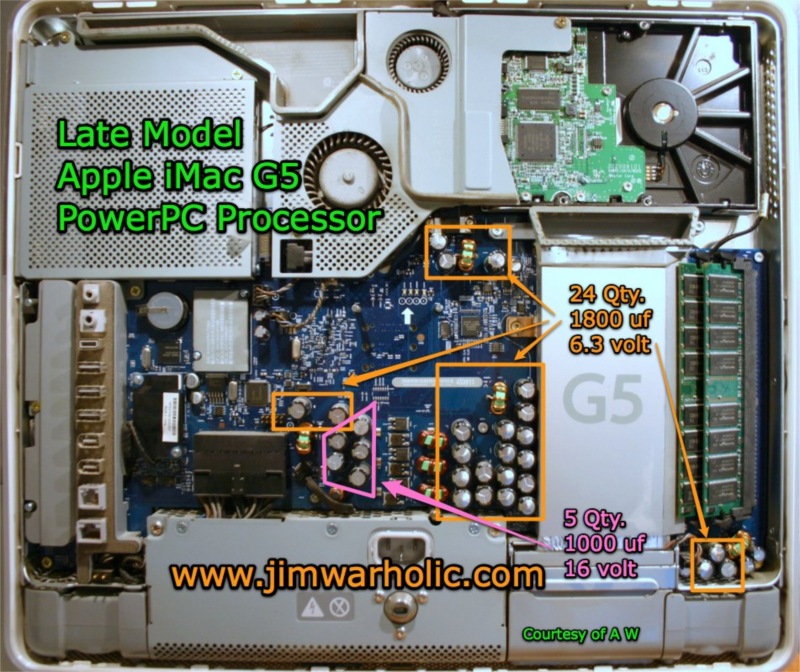
Location of Capacitors on MOB Next to Power Supply on 1st Generation Apple iMac G5
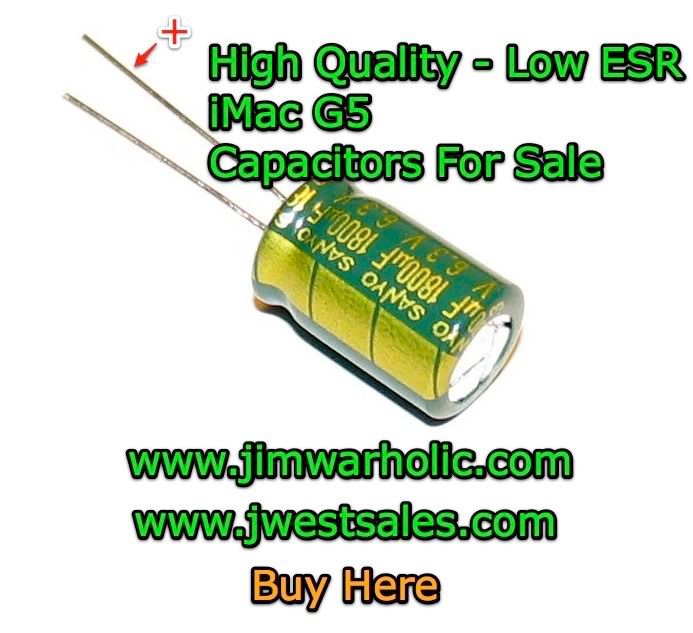
Article updated 12/17/11: Very Important! High Quality Low ESR capacitors, computer motherboard grade, 105ºC, 10mm X 16mm, caps are available for sale in kit form.
The logic board capacitor sizes included in the kits, are the original sizes of the capacitors on the logic board; making your job much easier to replace them. Important Note: The caps are a perfect fit for both diameter and height requirements, which is very important for the caps’ clearances to the back cover and extremely close mounting requirements. Reference the article: Fat Caps & Ripple Current for more electronics engineering & design insights.
International shipping is available for most countries worldwide. If your country isn’t listed for a shipping destination, please let me know to add your country to the list. Please provide your full name (first and last name) when ordering capacitors. Please refer to the Shipping Page for ordering and shipping information.
Send me an email if you would like to purchase ten or more iMac G5 cap kits, along with a note of which of the different cap kit sets you are interested in. Note: Apple early and late model iMac G5s with the PowerPC processor have different quantities of caps required on the MOB. Capacitor information is provided at my secure eCommerce website. Visually verify what capacitors your Apple iMac requires based on the pictures, and bring your iMac G5 back to life today.
Send me an email with any questions, or other special order requests. I have the power supply cap kits available too. Compare your PSU to the pictures. Feel free to contact me any time, with any questions. Take a look at the PSU cap kits that are available for purchase.
Apple iMac G5 Motherboard PowerPC capacitors replaced. The iMac mother board pictured above shows the locations of the new capacitors installed. Note: The heights and diameters of the new capacitors are slightly bigger in this picture, than the original caps. Upgraded to 1,800 uf 10 volts from the original 1,800 uf 6.3 volts. Please note these were larger diameters and taller than the original ones. They were a very tight squeeze between each of the caps. Back cover still clears (barely clears) all components. This information is for documentation sake. I don’t really recommend going up in the heights and diameters here. That is why I am selling the proper size caps for the mother board. If higher voltage caps, with the correct capacitance, good maximum current ratings, low ESR ratings, and temperature ratings were available, in the same exact physical case sizes, it would be OK to install those. However, higher voltage caps are not available in this size packaging.
Important notes are as follows. It appears as though lead free solder was used and a polymer was coated on the assembled motherboard on the bottom. A very hot soldering iron is required. Doing it yourself is not for the faint at heart. But fear not, you can do it if you follow this procedure.
It’s pretty easy to open the iMac case (first and second generation iMac models) and visually look at the caps. Simply lay it face down on a soft cloth. Loosen completely, the three screws on the bottom edge (Note: the screws will stay in), then just lift the back cover off from the bottom up. Visually inspect the capacitors for signs of expansion or tops that are rounded even slightly are an indication of bad caps.
Once you determine the status of the caps, then everything has to be disassembled, beginning with the removal of the power supply, which also can be a victim of bad caps and/or poor engineering, (see: DIY G5 power supply repair) in order to get to the bottom of the motherboard. Refer to the various Apple iMac G5 user and do-it-yourself part replacement manuals for details and visual instructions on how to remove various items. The cover is easy to take off by simply turning the three screws completely counter clockwise on the bottom of the computer’s lower edge and then lifting up the rear cover. The power supply (see: Apple Power Supply Removal and Replacement Instructions) then can be removed by unscrewing the mounting screws and disconnecting the main plug and the ambient light sensor cable (if you have an ambient light sensor model) to the motherboard, and partially turn the middle screw (about 5 turns clockwise) on the bottom of the case, which releases the back cover clamp, and the PSU will then lift out. Be careful not to damage the automatic ambient light sensor mounted on the bottom edge of the power supply unit. See this YouTube Video for what is inside the iMac G5 Computer. However once the cover is removed, the rest of the computer disassembly is quite a delicate task for most non technical people and requires special tools. Apple never actually intended for the end user to remove everything that I removed in order to get to the root of the matter.
A Torx screwdriver is not necessarily needed, though it would be helpful to use one. Check out the very handy magic screwdriver with the telescopic shaft with various size TORX bits for the mother board and other items. I had some precision screwdrivers that fit somewhat precisely in the fasteners, but it certainly would have been easier if I had the Torx screwdriver to begin with.
Here are some additional service notes and soldering tips. In addition to requiring a super hot soldering iron, one with good heat transfer and quick heat recovery, (a 60 watt soldering iron minimum is recommended) you may also need to grind off some of the polymer resin that is on the bottom of the circuit board, covering the capacitors’ leads, in order to get access to the lead free solder in the first place. See Soldering Tips for Lead-Free Soldering for detailed soldering tips and information. A proper soldering iron will make your job much easier and be able to quickly remove the capacitors from their mounts without having to do any special resin removal. I suggest ordering wider soldering tips, for use with a good quality soldering iron for a hotter and faster concentration of heat transfer. 
If you don’t use a hot enough soldering iron, the solder will never melt; you will just barely heat up the circuit board, and the capacitors will not come out. Also, if you have to
o small a tip, the heat will not transfer to the mother board very well, and the tip will cool down too fast when trying to melt the lead-free solder. If anyone would like to make a suggestion for a good quality soldering iron, at a reasonable price, with quick heat recovery, that can melt the lead free solder on this Apple motherboard, let us know here.
 While removing the 20 capacitors on the G5 logic board, I experienced broken leads from capacitors that were falling apart, and leads that pulled out of the capacitors themselves, because of the extra heat that is required to melt the lead free solder in the first place. Note the following section is included for information purposes only. Some folks have recommended I remove this reference to drilling the circuit board holes out. While this is not a recommendation of circuit board drilling, I have included it here only as to what I had to do to fix the problem. Others may have a much better “hole” cleaning solution. In fact, I highly recommend reading about the “pin point tip” desoldering trick, the new Chip Quik desoldering alloy and flux, and the importance of using a proper soldering iron first. To begin with, I had to use a Dremel power tool in various ways, though with a hotter and greater wattage soldering iron designed for lead-free soldering, which I bought for future MOB repairs, the following would have been a non issue. Prior to removal of the G5 caps, it was first necessary to grind off the polymer resin and some of the excessive lead lengths from the old capacitors with a small grinder tool attached to the Dremel, and then drilling out some circuit board holes with a number 72 (0.0250 inch) solid carbide drill was what I did when the old cap leads broke off in the holes of the printed circuit board. Beware of, drilling the holes out could damage the circuit board and break carbide bits inside the holes. That would not be good and making it most difficult to fix. Suggest using the Chip Quik desoldering product here instead of drilling out the pads on the PCB. Also note that drilling the holes can damage the through platting which is designed for connecting the top and bottom hole surfaces of the PCB, and might also be used for connecting to other traces and layers of the multilayer PC board. This would also make for a really bad through solder hole connection on the new capacitors being installed.
When replacing the capacitors it is important to note which are the positive and which are the negative leads when installing in the board. New capacitors generally have a long and short lead (short lead is usually the negative lead) along with a negative indicator written on the side of the cap itself. Warning: Do not install capacitors in backwards, or you will blow up the new caps and possibly damage the circuit board. The circuit board has the positive hole marked on the printed circuit board itself. Here is a how-to demonstration of how to replace capacitors. Also, keep in mind when soldering your new capacitors to the motherboard, if you just have a round blob of solder on the bottom of the board, without it fully flowing through the holes, you can have cold solder joints. If you place heat on the legs of the caps for too long, you can also damage the new capacitors. A very hot soldering iron with quick heat recovery, and a wide tip is the best solution. See notes above about the recommended soldering iron. More information at: Soldering Tips For Lead-Free Soldering.
Special Attention to Details Area. At this point in the iMac repair process, after the new caps are completely installed, and properly soldered in the holes on the motherboard, you must trim off the excess new caps’ lead lengths on the bottom surface of the motherboard. Take a pair of diagonal cutters, and snip the leads to the proper lengths, making sure you do not get any metal fragments lodged in the motherboard or inside the chassis area of the iMac computer. Failure to cut the leads to the proper lengths could result in short-circuits, damaged capacitors, blown electronic components, and a blown iMac motherboard or power supply unit.
iMac Logic Card Bottom Side View
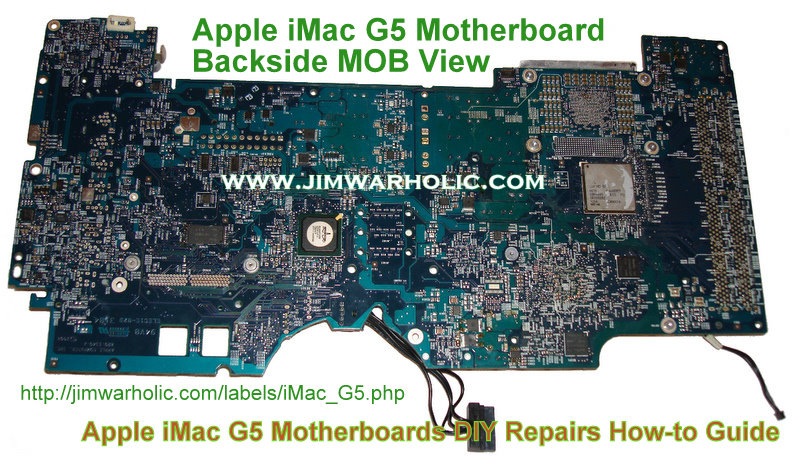
Once the capacitors are replaced on top of the motherboard, then it is time to reinstall the motherboard back into the chassis. Pictured above is the bottom of the MOB logic card, with the small square just to the right of the “.com” which is the location of the main processor (CPU) that protrudes from the bottom of the logic card. Do not try to remove this processor chip. Clean this area and the metal heatsink area that matches up to the CPU with alcohol, and apply fresh heat sink compound. I suggest when ordering the capacitors that you also order the thermal paste heatsink compound at the same time. You can order the thermal compound online from my J West Sales Store.
From George T.
“First off, the cap replacement fixed all the prior problems: i) endless blue screen on normal boot but OK with safe boot; ii) video breakup and horizontal bars; and iii) excessive fan speed. Now to the issue at hand…
The first thing the CPU does, based on ROM instructions, is check the RAM. If the RAM is OK the chime sounds. Therefore, if there is no chime, either the CPU is not working properly or a RAM chip is defective. This test covers the basic hardware and comes before the hard drive boot starts. The 3rd LED comes on early in the hard drive boot, but definitely after the chime.
My problem was no chime, and the reason was that the CPU wasn’t working. The CPU wasn’t working because I slopped some thermal grease over the circuit board items above the CPU. These items are marked “RAM clock” on the board.
Internet research revealed that the thermal grease is full of metallic silver. Furthermore, although there is little or no electrical conductivity, the grease is very capacitive. If it is sitting on the components, or even above the insulating copper tracings of the circuit board, it has low impedance at the clock frequency — it is a virtual short circuit. Once I cleaned off the grease, the board worked properly.
I would suggest that you incorporate this caution in your otherwise excellent instructions.”
Jim W. “Thank you George for the great insight.”
Arctic Silver Inc. manufactures a very good quality thermally conductive grease for modern high-power CPUs for Apple, Intel, and AMD, along with other high-performance heatsinks or water-cooling applications. Arctic Silver manufactures the Arctic Silver 5 product and the Arctic Silver Ceramique thermal compounds, and are world renown as being two of the best thermal heatsink compound options available. CPU Overclockers rave over Arctic Silver products.
When applying the Arctic Silver thermal paste compound (either the Arctic Silver 5 or Céramique 2), less is better, (see the warning on the left) paper thin is best. Please review instruction sheets for applying Arctic Silver 5 and also the Arctic Silver Céramique 2 instructions of use and proper application procedures. On Motorola chips, I use the covering of the whole surface with a very thin layer method as opposed to a dot in the middle method. Just be sure that very little if any comes out of the edge of the chip when the board would make contact with the heat sink. The way the application works is, the thermal paste fills the minor imperfections in the metal surfaces and removes the air spaces between the two joining metal surfaces and helps improve the heat transfer between the CPU and the heatsink. See image above for the the small square area right location, for the thin application of the thermal grease. Check out this Thermal Paste Comparison from Techware Labs review of the pros and cons of using the most popular thermal pastes available at the time the article was written. The article, while being somewhat dated, provides good insights into the differences between Silver Grease and Silicone Paste, and which is better for a computer CPU heatsink application. I would stay away from the silicon paste compound, because quite frankly, silicon paste or silicon grease does a poor job of keeping the CPU cool under load conditions based on the test results at that time.
Believe it or not, I have to say the finished project has worked like a champ. As a matter of fact, I have used the same iMac G5 here to do the pictures with a program called Skitch, and posting this article using Firefox running on the iMac too.
At this point in time, I’m not sure I would use any of those Rubycon Caps again. As the old saying goes, “Fool me once, shame on you; fool me twice, shame on me.” Rubycon, why did you use an improper electrolytic recipe? Was it cheaper to make those caps with the cheap electrolyte with the missing ingredient?
 Note: I inspected my work a couple of weeks later, and decided to replace the five other capacitors also. I found some evidence online that these other capacitors go bad too. The 20 capacitors that I first replaced all looked good. Upgraded these five additional caps from the original factory installed 1,000 ufd, 16 vdc caps, to 1,000 ufd, 25 volts DC, operating temperature range: -55º to 105ºC. I should point out here that these were a larger diameter and taller than the original ones. They were a tight squeeze. I picked up both sets of capacitors at Halted Electronics a surplus store in Santa Clara, CA. They also have some new electronic components available at the store too. Generally speaking, it is usually OK, and advisable, to increase the DC voltage rating of the capacitors while maintaining the same MFD, microfarad rating. Don’t cut corners. As a suggestion, if you see any of the capacitors that have problems, it is highly advisable to replace the entire group of caps at the same time. If one or two of the caps are in the failure mode now, they would more than likely all be destined to fail in a very short time.
As an aside note, I included the previous paragraph information in this article as a historical troubleshooting and engineering evaluation note. I would suggest not installing surplus caps as a general fix for this problem and subsequently have installed “new” caps in this iMac. The problem with “old” surplus caps, you have no idea how old and long the capacitors have been sitting on the shelf with potential “shelf life rot”. I actually witnessed this capacitor shelf life rot on some of the first capacitors I looked at in the surplus bins before they got more from the back room. Many of the surplus caps are generic brands, or do not have proper low ESR ratings, or are general purpose capacitors that should not be used in mother board applications. Note that as of 8/15/2010, as I mention above, I upgraded this originally repaired iMac G5 with the surplus “old” caps to the proper sized and proper voltage rated “new” capacitors. Don’t shortchange yourself in your repair efforts here; order proper low ESR motherboard and power supply grade capacitors.
LED Indicator Lights

The LEDs on the main logic board (motherboard or MOB) indicate the following:
* LED #1 means it is detecting trickle voltage from the power supply unit, PSU. If you don’t see this LED, with the machine off but plugged in, it is not a good candidate for PSU repairs unless fuse is blown on the PSU itself, and the PSU should be replaced in this case.
* LED #2 comes on when the MOB sees all the correct powers (proper voltages present from PSU).
* LED #3 indicates the computer and LCD are talking (communicating) OK.
* LED #4 is strictly an overheating indicator LED, and should not go on under normal circumstances.
Another interesting bit of information regarding noisy iMac G5 fans and internal temperatures that I discovered after the G5 motherboard repair, it became apparent, the computer fans were running a lot quieter. No more Hoover Vacuum cleaner sounds. Also, the overall temperature of the computer is operating at lower temperatures in my opinion. I found this free Temperature Monitor program for keeping track both instantaneously and in a graph chart form, of what the CPU, Hard Drive, and Smart Disk drive temperatures are operating at. I did not have the program installed prior to the problem, but after I repaired the printed circuit board, I installed the temperature recorder and discovered that the CPU temperature does not get much above 65 degrees C, even with a warm ambient room temperature. The average temperature of the CPU is somewhere in the 58 degree C range (136 degrees Fahrenheit). Note: I keep my computer running for days and weeks on end.
I am still a bit ticked off that I had to go and do this myself. I had the Apple extended care warranty, but I missed out on the free repair by two months. If I had the problem occur two months earlier, Apple would have covered it free of charge. Apple never sent a message concerning the problem. It took some investigative work to find out that they had issues with the capacitors leaking, but they downplayed the severity of the problem.
This should not happen with a product three years old. In Apple’s defense I can tell you that I found evidence that many other computer manufacturers also had the capacitor problems from buying low cost capacitors from a stolen electrolytic capacitor recipe from Taiwan. See this video showing computer circuit boards with bulging, leaking, and exploded capacitors on board from a variety of computer manufacturers. While I am a fan of Apple products, I just have to say this is not one of their stellar computer products moments. I’m sure it was a business decision to not have a product recall, but I think they should have had one. Of course, I guess you could say, I’m a little biased on this issue.
Yes, the Apple Store folks were nice enough to take a look inside the iMac at the local Mac Genius Bar, and give me a heads up on what the problem was, though it only took a five second look inside for the Apple guy to tell me that I need a new motherboard, and oh by the way, the total cost (approximately $750.00) was going to be two thirds the cost of a brand new computer. The Apple Store guys suggested I buy a new Apple desktop computer, one that is faster and better.
I said, “not today.”
Inside 1st Generation Apple iMac G5 20 Computer

Location of Major Components in 1st Generation Early Model Apple iMac G5 20
Here’s what you get (pictured above) inside the Apple iMac G5 Desktop computer. CD/DVD in the upper left, two fans in the top center, hard drive top right, two memory slots available for up to 2 GB of two 1 GB DDR PC 3200 memory sticks, power supply in the lower section, and the mother board in the middle. Look closely, and you can see the on board battery for the motherboard.
Apple Second Generation iMac G5 Computer
Compare your Apple iMac with the picture above. Is yours an early model first generation or late model second generation Apple iMac G5?
Printout this PDF file of the Apple iMac G5 Motherboard Repair article for reference before you take a bite of your Apple apart. Opun the back door.
iMac G5 17 & 20 Inch Models
Here is a Apple link on how to identify your iMac and how to check the EMC number on the bottom label.
As one last thought before the night is over, lead free solder is a pain in the rear. Repairing all types of electronics is going to become increasingly difficult with these high temperatures required to remove and install new components in their place. We are becoming more and more, a disposable society.
Also, I think it is quite comical reading the Apple repair extension program especially the section about not fixing the desktop computer yourself, now that I have fixed it myself. And, the one that says if you don’t have any of these problems there is no need to do anything, “just wait for it to break after warranty,” my two cents added.
Read it for yourself. I guess I am breaking all the rules here.
And for those that want to check out their iMac G5 for the extended service, here is the quoted information from Apple support.
iMac G5 Repair Extension Program for Video and Power Issues
November 2, 2006Frequently Asked Questions
The iMac G5 Repair Extension Program for Video and Power Issues applies to first generation iMac G5 computers that have video or power-related issues as a result of a specific component failure. If your iMac G5 is exhibiting any of the symptoms listed below and your computer’s serial number is within the noted ranges, your computer may be eligible for repair, free of charge. If Apple or an Apple Authorized Service Provider (AASP) determines that your iMac G5 computer is eligible as part of the program, the repair will be covered by Apple for up to three years from the original date of purchase even if your iMac G5 is out of warranty.This is a worldwide Apple program.
Affected systems will exhibit one of the following video- or power-related symptoms:
- Scrambled or distorted video
- No video
- No power
Note: If your iMac G5 is not experiencing any of these symptoms, you do not have to contact Apple or any Apple Authorized Service Provider.
Which iMac G5 computers are affected by the iMac G5 Repair Extension Program for Video and Power Issues?The program is available for certain first generation iMac G5 models that were sold between approximately September 2004 and June 2005 featuring 17- and 20-inch displays with 1.6GHz and 1.8GHz G5 processors.
The affected iMac G5 computers have serial numbers where the first 5 digits fall into the ranges noted below.
Serial Number ranges:
- W8435xxxxxx – W8522xxxxxx
- QP435xxxxxx – QP522xxxxxx
- CK435xxxxxx – CK522xxxxxx
- YD435xxxxxx – YD522xxxxxx
Some second generation iMac G5 computers have serial numbers that fall within the upper band of the ranges listed below. Only first generation iMac G5 computers are affected by this program.
Where do I find the serial number of my iMac G5?
The 11-digit serial number is located on a label under the foot of the iMac G5. There is a bar code underneath the serial number.
To view the label, hold the sides of the iMac and gently lay the computer face down on a soft, clean towel or cloth.
Is the iMac G5 Repair Extension program available for other Apple computers?This program applies only to the systems noted in this FAQ. Other versions of the iMac G5 line are not part of this program. Click here for more information on how to identify iMac G5 models.
How can I tell if my computer is affected by the component failure identified for the iMac G5 Repair Extension Program?
An Apple technical support representative or an Apple Authorized Service Provider (AASP) will need to physically examine your computer to determine if the component failure identified for the iMac G5 Repair Extension Program affects your computer and, if so, arrange for the repair.
How can I participate in the iMac G5 Repair Extension Program?
To participate in the program, please bring your iMac G5 to the Mac Genius Bar at your local Apple Retail store or Apple Authorized Service Provider (AASP), or call your local Apple Contact Center.
Apple Retail Store
Apple Authorized Service Provider
Apple Support Contact information
What if my computer exhibits symptoms not caused by the component Apple has identified for the iMac G5 Repair Extension Program?
It is possible that your iMac G5 may exhibit video or power issues that are unrelated to the component failure identified by Apple as part of this program and are not covered under this program. Apple or an AASP can help you troubleshoot these issues. If your iMac G5 is not covered under warranty or an extended service agreement, such as the AppleCare Protection Plan, repairs for other issues will be made at your expense if you request that they be made.
I have a remanufactured iMac G5 that fits the description noted. How can I determine whether my iMac G5 qualifies for the program?
If your iMac G5 is one of the models listed and exhibits one or more of the symptoms above, please bring your iMac G5 to the Mac Genius Bar at your local Apple Retail store or Apple Authorized Service Provider (AASP), or call your local Apple Contact Center. An Apple technical support representative or an AASP will examine your computer to determine if the component failure identified for the iMac G5 Repair Extension Program affects your computer and, if so, arrange for the repair.Is there a cost for participating in the iMac G5 Repair Extension Program for Video and Power Issues?
If Apple or an Apple Authorized Service Provider (AASP) determines that your iMac G5 computer is eligible as part of the program, the repair will be covered by Apple even if your iMac G5 is out of warranty. Customers are responsible for transportation costs to eligible ASPs/retail stores.
How long is the iMac G5 Repair Extension Program available?
The program covers affected iMac G5 computers for up to three years from the original date of purchase. Apple will continue to evaluate the repair data and will provide further repair extensions as needed.
Does the iMac G5 Repair Extension Program extend the warranty coverage on my iMac G5?
No. This program does not extend the standard warranty coverage.Are there any known safety issues caused by this component failure?
No.Can I determine if my iMac G5 has the component failure and fix it myself?
No. Apple or an Apple Authorized Service Provider (AASP) must evaluate whether your iMac G5 computer is eligible as part of the program and then conduct the repair.If my iMac G5 is still under warranty, how does this program affect me?
If your iMac G5 is eligible for the program and within its warranty period, you will have your system repaired at no cost to you. If your iMac G5 experiences the symptoms described above and is determined to be eligible under this program by Apple or an AASP after your Standard One Year Warranty expires, the program covers affected iMac G5 computers for up to three years from the original date of purchase.Home >Support > iMac > iMac G5 Repair Extension Program for Video and Power Issues


*** Just as a reminder, it is also a good idea to check your iMac G5 power supply. A bad power supply, will produce excessive ripple on the output voltages because of bad internal PSU capacitors, and can cause your new capacitors on the MOB to quickly fail. It is not hard to check the PSU caps. Go to the article on the Apple iMac G5 Power Supply for more detailed information and what you should be aware of. I have the complete PSU cap kits in stock. For a list of the capacitors required on the PSU, take a look at the Inside the Apple iMac information articles.
A Few Concluding Remarks
- Do a quick visual inspection of the inside of your iMac G5 for bad caps.
- Replace both types of caps completely even if one or two is visually bad, since it is most likely the other caps are in a failure mode too.
- A good soldering iron or station is most desirable for this DIY project. Use good lead-free soldering techniques.
- Inspect your iMac G5 Power Supply too. Bad caps in the PSU can directly affect the caps on the MOB.
———–
By the way, get a professional website solution, with Professional Web Services customized websites and Professional Web Services Internet marketing business solution. Get your business discovered online. Contact us for the online sales and marketing solution now. Internet marketing services from Professional Web Services.